Fermented Pineapple Honey Remedy for Coughs and Colds
Sweet, tangy, and quietly fizzy — fermented pineapple in honey is the remedy jar that surprises everyone. Pineapple brings bright flavor and natural enzymes, honey brings the soothing sweetness, and a few days of gentle fermentation turn them into a syrup people reach for when a cough starts tickling.
The pineapple softens until it is almost spoon-tender. The honey thins into a golden, fruit-scented syrup. Tiny bubbles appear, and the flavor turns from simply sweet to sweet-tart. It is no wonder this old-fashioned honey-fermented fruit has become popular again.
This is a traditional home remedy, not a medicine. It does not cure a cough or a cold, and it should never replace care from a doctor when you need it. Think of it as a comforting, pleasant-tasting kitchen preparation to enjoy while you rest, drink fluids, and give your body time to recover.
Why This Combination Works So Well Together
- Pineapple contains bromelain, an enzyme studied for its soothing properties.
- Honey is a classic throat-coater used in cough remedies worldwide.
- Fermentation deepens the flavor and makes the pineapple wonderfully soft.
- It tastes like dessert — no forcing this one down.
There is a practical reason these two pair so well. Fresh pineapple is juicy and full of natural fruit sugars. Honey is thick, sweet, and low in water when undiluted. When you combine them, honey draws juice out of the pineapple, the juice thins the honey, and that slightly watery mixture is what allows gentle fermentation to begin. You get the coating feel of honey plus the bright flavor of pineapple, rounded by a few days in the jar. Pineapple also provides vitamin C as part of a normal, varied diet, while honey has been used in warm drinks for centuries because its texture feels soothing on a scratchy throat. Neither ingredient needs to be exaggerated to be appreciated.
What Fermentation Actually Means, in Plain Language
Fermentation can sound technical, but in this jar it is simple. Fermentation is what happens when tiny, naturally present microorganisms — mainly friendly yeasts and bacteria — feed on natural sugars and create small amounts of acid, gas, and new flavors as they work.
Those microorganisms are already present in raw honey and on fresh fruit. You do not need to add them. When honey is thick, there is not enough available water for them to be active, so honey stays stable in the cupboard. Once pineapple juice thins the honey, the yeasts and bacteria wake up, consume some of the sugars, and produce carbon dioxide — the gas behind the bubbles and gentle fizz — along with mild acids that give the syrup its pleasant tang.
Think of it like bread dough rising or yogurt setting. You are not cooking the mixture, and you are not preserving it like jam. You are giving natural ingredients time at room temperature to transform, then moving the jar to the fridge to slow everything down once the flavor is where you like it. Made as directed and refrigerated promptly, it should not taste strongly alcoholic, though a faint fermented aroma is normal. If that aroma becomes strong or unpleasant, discard the batch, as explained on page 3.
Bubbles are expected. A little foam is common. Fruit floating at first is normal. A flavor that gets slightly more tart each day is exactly what should happen. What is not expected is fuzzy mold or a rotten smell.
Choosing a Ripe Pineapple
Your jar will only taste as good as the fruit you start with. A ripe pineapple gives natural sweetness, plenty of juice to start fermentation, and a softer texture in honey. An underripe pineapple tastes harsh and starchy, while an overripe, bruised one may ferment too fast and develop off flavors.
Look for these signs:
- Color: Mostly golden-yellow skin, especially around the base. A fully green pineapple is usually underripe.
- Smell: Sniff the base. A ripe pineapple smells sweet and fruity. No smell often means it is not ready. A sour, vinegar-like smell means it has gone too far.
- Feel: Heavy for its size, which suggests juiciness, and giving very slightly when squeezed gently. Avoid mushy spots, leaking juice, or mold around the base.
- Leaves: The central leaves should look green and fresh.
Use the pineapple within a day or two. Wash the outside under running water before cutting, even though you will discard the skin, so your knife does not carry dirt into the flesh. Cut off the top and base, slice away the peel, remove any dark “eyes,” and cut out the hard core — discard it or save it for smoothies. Cut the tender flesh into small, even chunks, roughly 1/2-inch to 3/4-inch pieces. Smaller pieces release juice faster and are pleasanter by the spoonful later.
Fresh is the clear first choice. Canned pineapple has been heat-treated and packed in syrup or juice, so it will not behave the same way.
Choosing Your Honey, and Jar Hygiene
Use raw honey if you can. Raw, unpasteurized honey is the traditional choice for honey ferments because it still contains the naturally present yeasts that help the process start. A mild, light honey lets the pineapple shine; a darker honey gives a deeper result. If your honey has crystallized, warm the sealed jar gently in warm water until it pours again. Do not pour hot honey over the fruit.
Jar hygiene matters more than fancy equipment. Choose a large, clean glass jar with a wide mouth — a quart-size jar is comfortable for one pineapple — so you can fit the fruit in and spoon syrup out easily. Glass lets you see bubbles and anything concerning at a glance. Wash the jar, lid, knife, cutting board, and spoon in hot, soapy water, rinse well, and dry with a clean towel. You do not need special airlocks or weights for this short ferment, but always use a clean spoon — never one that has been in a mouth — when you stir or taste.
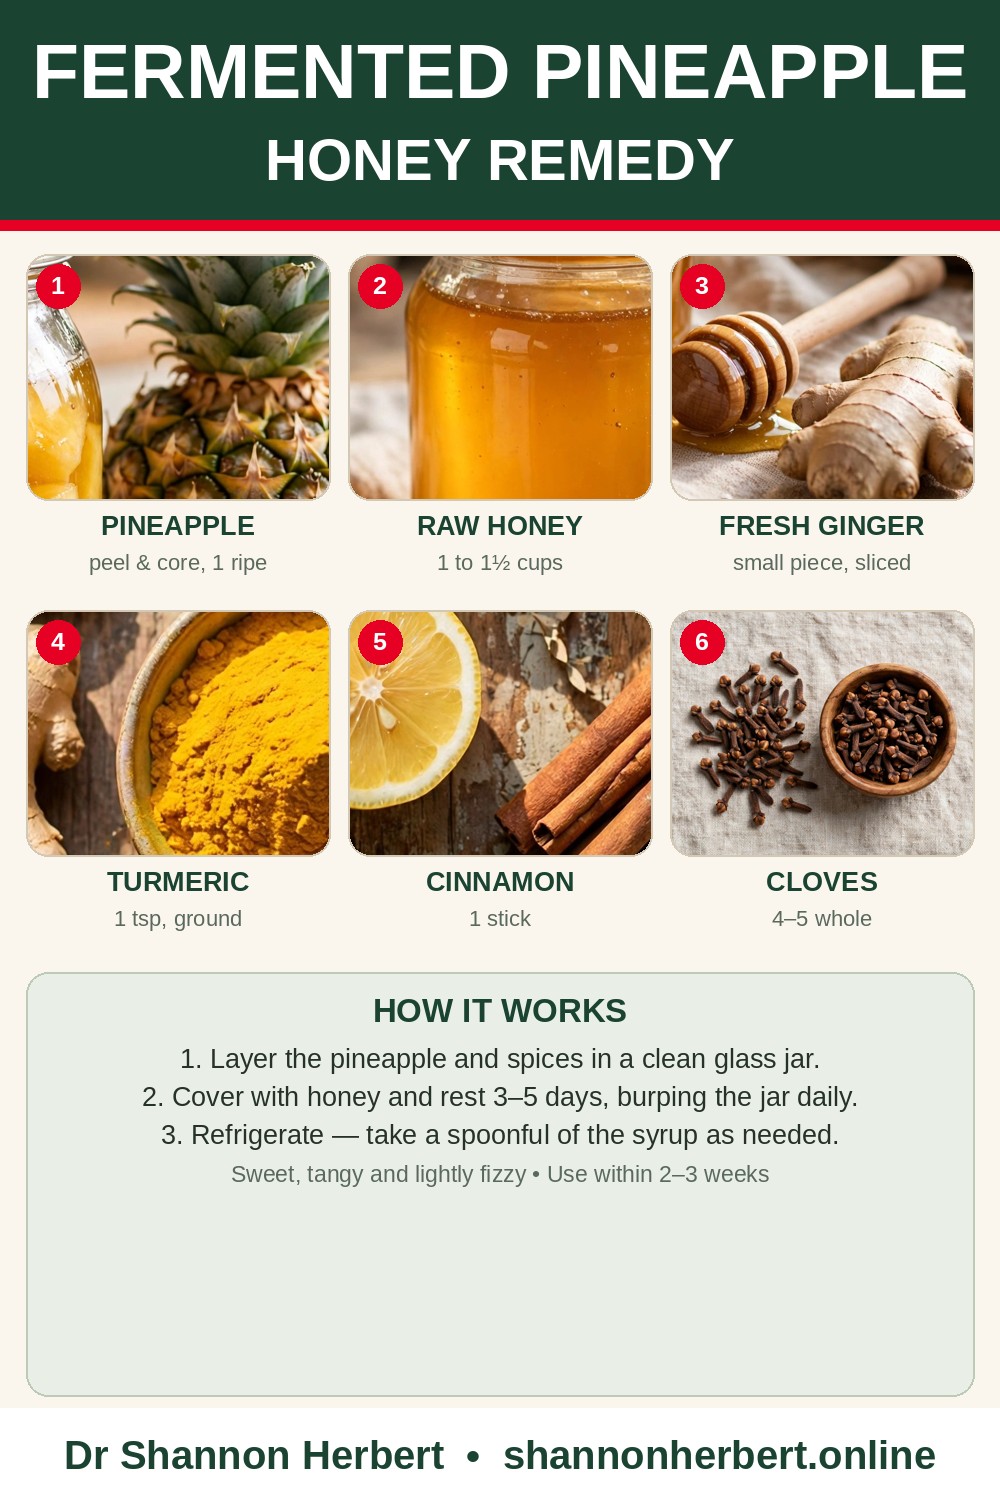
What You Need
- 1 ripe pineapple
- 1 to 1 1/2 cups raw honey
- A large clean glass jar
- Optional: a small piece of fresh ginger, sliced
That is the whole recipe at its simplest. It also helps to set the jar on a small plate in case fermentation bubbles over a little, and to label the jar with the date you made it.